Building Handheld UIs with Kivy
Kivy is a Python-based open-source library for writing GUI applications, for touch-screen based systems. Kivy supports both desktop environments and mobile operating systems like Android and iOS. In our previous article, we talked about porting Kivy to Yocto, on the Colibri T-20. In this article, we demonstrate what Kivy features make it suitable for building UI for handhelds, with the case study of a barcode based asset tracker.
Case Study and System Design
The handheld device can be provided a list of assets and their asset IDs. These asset IDs are tagged on the devices using barcode stickers. The handheld device has camera that allow the user to capture the barcodes.
There are multiple ways to identify a location indoor, using BLE tags, WiFi beacons, etc. In this system, the location of the asset is identified using WiFi access points, placed at all asset locations, with SSIDs having a prefix like "LOC-". The handheld device scans the environment for nearby WiFi access points, and the nearest access point is used as the location of the asset.
The screens and their transitions is depicted in the following diagram.
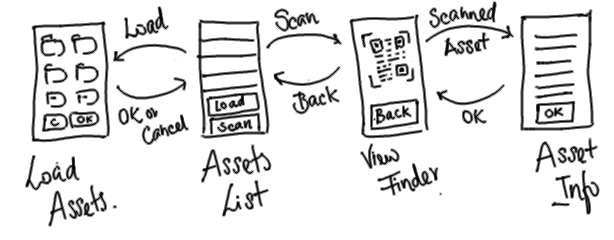
- Assets List
-
Shows the list of assets, and if the barcode of the asset has been scanned.
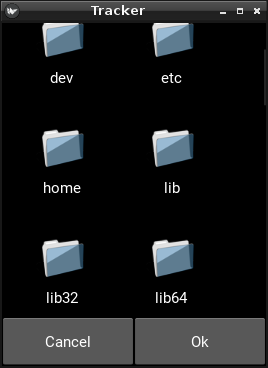
- Load Assets
-
Allows the user to load the assets from a JSON file, containing the asset type and the corresponding asset ID.
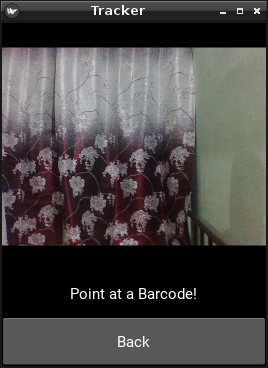
- View Finder
-
The camera feed is shown to the user, to point and scan barcodes.
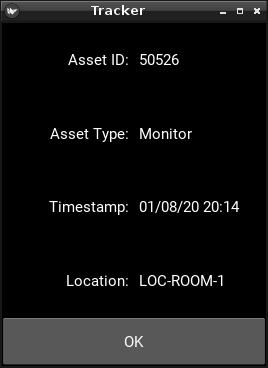
- Asset Info
-
If a barcode is scanned, then the barcode, the asset details, and location information is displayed to the user.
Implementation in Kivy
The implementation’s source is available from /static/code/asset-tracker/[here.] The following libraries were used in the implementation.
-
Kivy - for the UI
-
pyzbar - for decoding barcodes
-
python-iwlist - for getting list of WiFi APs
Like any other UI library, Kivy has an array of widgets, support for events, and great choice of layout managers. But below we highlight some of the features of Kivy, that make it a great choice for building UI applications for embedded systems.
Kv Language
UI description is a problem, that every UI library has to address. Some libraries provide a GUI tool for describing the GUI, and while with many others the only option is to write the entire description in the program.
Kivy provides a middle ground, using the Kv language, where the UI can be described in a convenient DSL. This avoids having to code incomprehensible UI description in the program, without the pains of GUI tool where repetitive descriptions are hard.
The complete UI description is available in the /static/code/asset-tracker/tracker.kv[tracker.kv] file. You can read more about the Kv language at https://kivy.org/doc/stable/guide/lang.html
Programming Model
Kivy’s UI programming model, follows a pattern where developers customize, extend and compose existing widgets to create more larger widgets, which are then combined to create the application. Kivy does this by simplifying the creation of custom widgets, by providing the necessary tools for developers to do so. For example, it is possible to define custom widgets, with the Kv language alone.
The following extract from the tracker.kv file shows how the Label
is customized, to create multiple variants InfoLabel, KeyLabel and
ValueLabel. This can avoid repetition of the style multiple times as
seen in the definition of the AssetInfoScreen.
<InfoLabel@Label>:
    valign: "middle"
    text_size: self.size
    padding: 5, 5

<KeyLabel@InfoLabel>:
    halign: "right"

<ValueLabel@InfoLabel>:
    halign: "left"
Kivy also supports the concept of properties (different from Python properties). When a derived widget is created by composing other widgets, Kivy allows a derived widget to have a property that determines the value of property of widgets being composed. When the derived property is updated it is automatically propagated to the composed widgets. This further reduces the need to write boiler plate code to propagate changes, making creation of widgets simpler.
The definition of AssetInfoScreen is shown below, which defines the
properties asset_id, asset_type, timestamp and location. These
properties are used in the text property of ValueLabel. When the
property is updated in the AssetInfoScreen, the corresponding label
text property is updated.
<AssetInfoScreen@Screen>:
    asset_id: ""
    asset_type: ""
    timestamp: ""
    location: ""

    BoxLayout:
        orientation: "vertical"
        GridLayout:
            cols: 2
            KeyLabel:
                text: "Asset ID:"
            ValueLabel:
                id: asset_id_label
                text: root.asset_id
            KeyLabel:
                text: "Asset Type:"
            ValueLabel:
                id: asset_type_label
                text: root.asset_type
            KeyLabel:
                text: "Timestamp:"
            ValueLabel:
                id: timestamp_label
                text: root.timestamp
            KeyLabel:
                text: "Location:"
            ValueLabel:
                id: location_label
                text: root.location
        SizedButton:
            text: "OK"
            on_press: root.manager.current = "view_finder"
Screen Manager
Kivy has a built-in Screen Manager, which makes multi-screen designs a breeze. This is especially important for systems with limited display capabilities like mobile phones and embedded systems.
The ScreenManager is extended and the various screens are specified
in the asset tracker as shown below.
<Screens@ScreenManager>:
    AssetListScreen:
        name: "asset_list"
    ViewFinderScreen:
        name: "view_finder"
    AssetInfoScreen:
        name: "asset_info"
    LoadAssetsScreen:
        name: "load_assets"
The switching between screens is achieved by setting the current
property of the ScreenManager, as show in the definition of the Ok
button in the AssetInfoScreen.
        SizedButton:
            text: "OK"
            on_press: root.manager.current = "view_finder"
Touch Screen Capability
The interface of handheld devices can be simplified by using a touch screen. Only buttons that are frequently used or that needs to be conveniently accessed, needs to be a physical button, the remaining buttons can be implemented in software.
Kivy is natively designed for touch screen based systems, and has a virtual keyboard, integrated with widgets that need text input. Many of the widgets like list views and file chooser are designed with support for touch screen gestures like drag, tap and double-tap.
Recycle View
Embedded systems have limited memory and processing capabilities. It is necessary to ensure that the system is not overwhelmed with the need to create and deal with a large no. of widgets. This is especially important when displaying a large list of items.
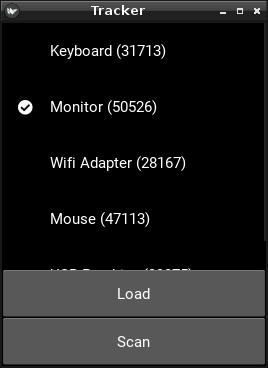
Kivy has a RecycleView, that can display large a list of items,
without bringing the system to a grinding halt. The RecycleView uses
a MVC design pattern, and only the visible row widgets are created by
the Kivy. The AssetListScreen usage of RecycleView is shown
below. Here viewclass property specifies the widget to be
instantiated for each row.
<AssetListScreen@Screen>:
    BoxLayout:
        orientation: "vertical"
        RecycleView:
            id: asset_list
            viewclass: "AssetLabel"
            RecycleBoxLayout:
                orientation: 'vertical'
                default_size: None, dp(56)
                default_size_hint: 1, None
                size_hint_y: None
                height: self.minimum_height
        SizedButton:
            text: "Load"
            on_press: root.on_load_pressed()
        SizedButton:
            text: "Scan"
            on_press: root.on_scan_pressed()
The data for the RecycleView is computed from the loaded and scanned
assets, and updated on the RecycleView when the screen is
entered. Read more about
Kivy’s
RecycleView here.
Conclusion
Hope this article has highlighted many of Kivy’s features, that enables it to be used it handhelds and other embedded systems. Hope this helps you understand what is possible with Kivy, and help decide if it would be suitable for your next embedded project. For more details about Kivy, visit the project’s website.
If you are interested in using Kivy for your embedded Linux projects or developing Python applications for embedded systems, in general, do get in touch with us at sales@zilogic.com