4G bring up from scratch
Introduction
This article talks about 4G bring-up from scratch using the OAI code base. The idea is to collate the data available and provide a sequence of instructions that would help bring up a 4G eNB and a 4G UE in a single linux machine, using namespaces.After the setup is up, i.e, when the UE is able to connect to the eNB, the interface is tested by browsing. The results are recorded. Images are added, describing the LTE architecture, for better understanding.
Overview
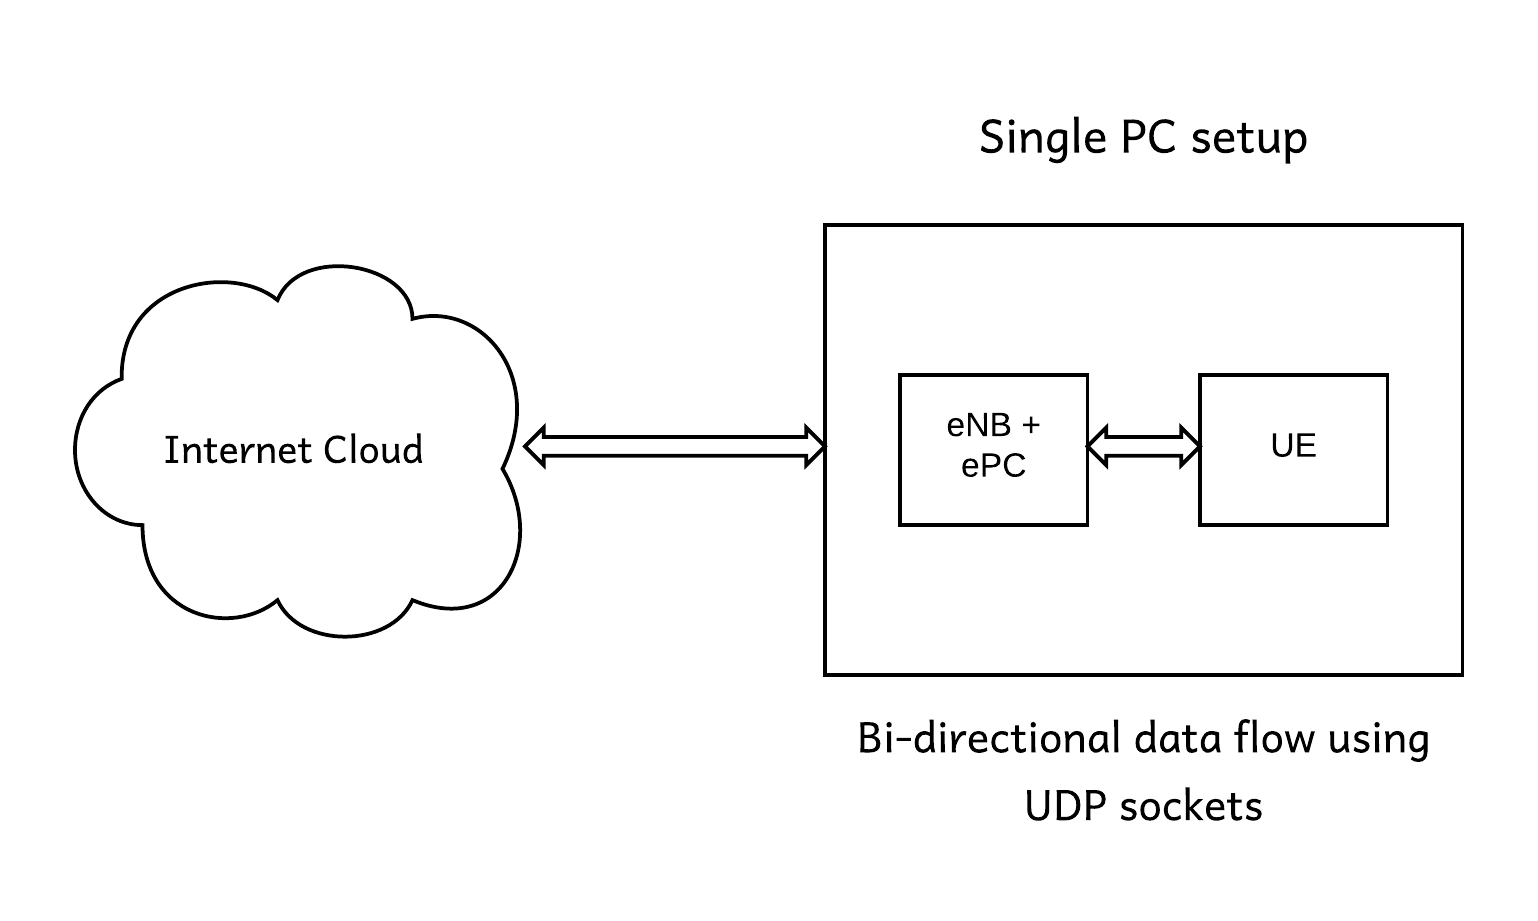
The above setup is a 4g setup using the OAI code. Using this setup it is possible to browse internet and can ping the eNB+ePC from the UE. The connection is over an UDP socket. The eNB is also referred to as evolved Universal Mobile Telecommunications System (UMTS) Terrestrial Radio Access, as a logical extension of 3G which was referred to as UMTS
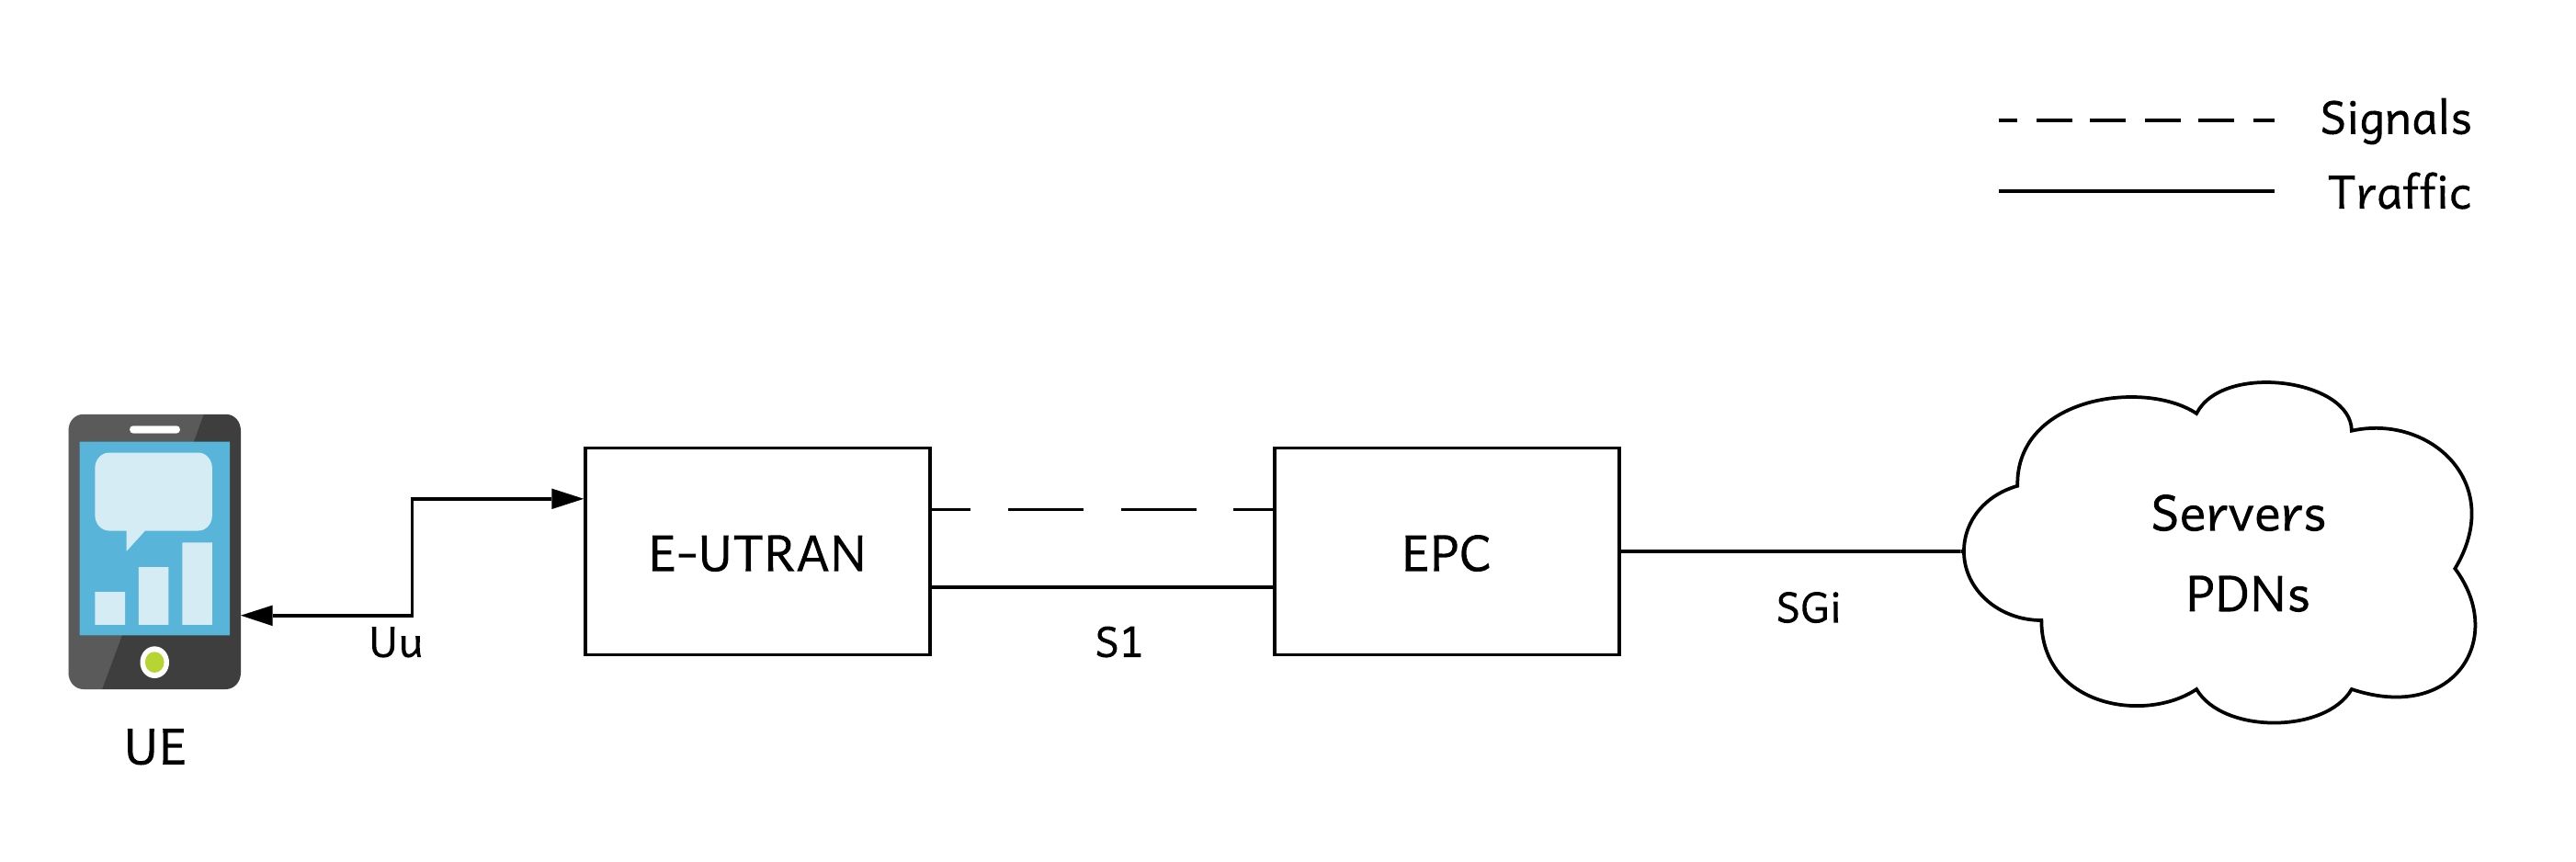
The above picture depicts a real-life UE/e-UTRAN setup over the wireless link interface Uu. Uu, S1, SGi are the interfaces as defined by 3gpp standardisation commitee.
The eNB has the following software components – PDCP, RLC, MAC and PHY expanded as Packet data convergence protocol, radio link control, medium access control and the physical layer.
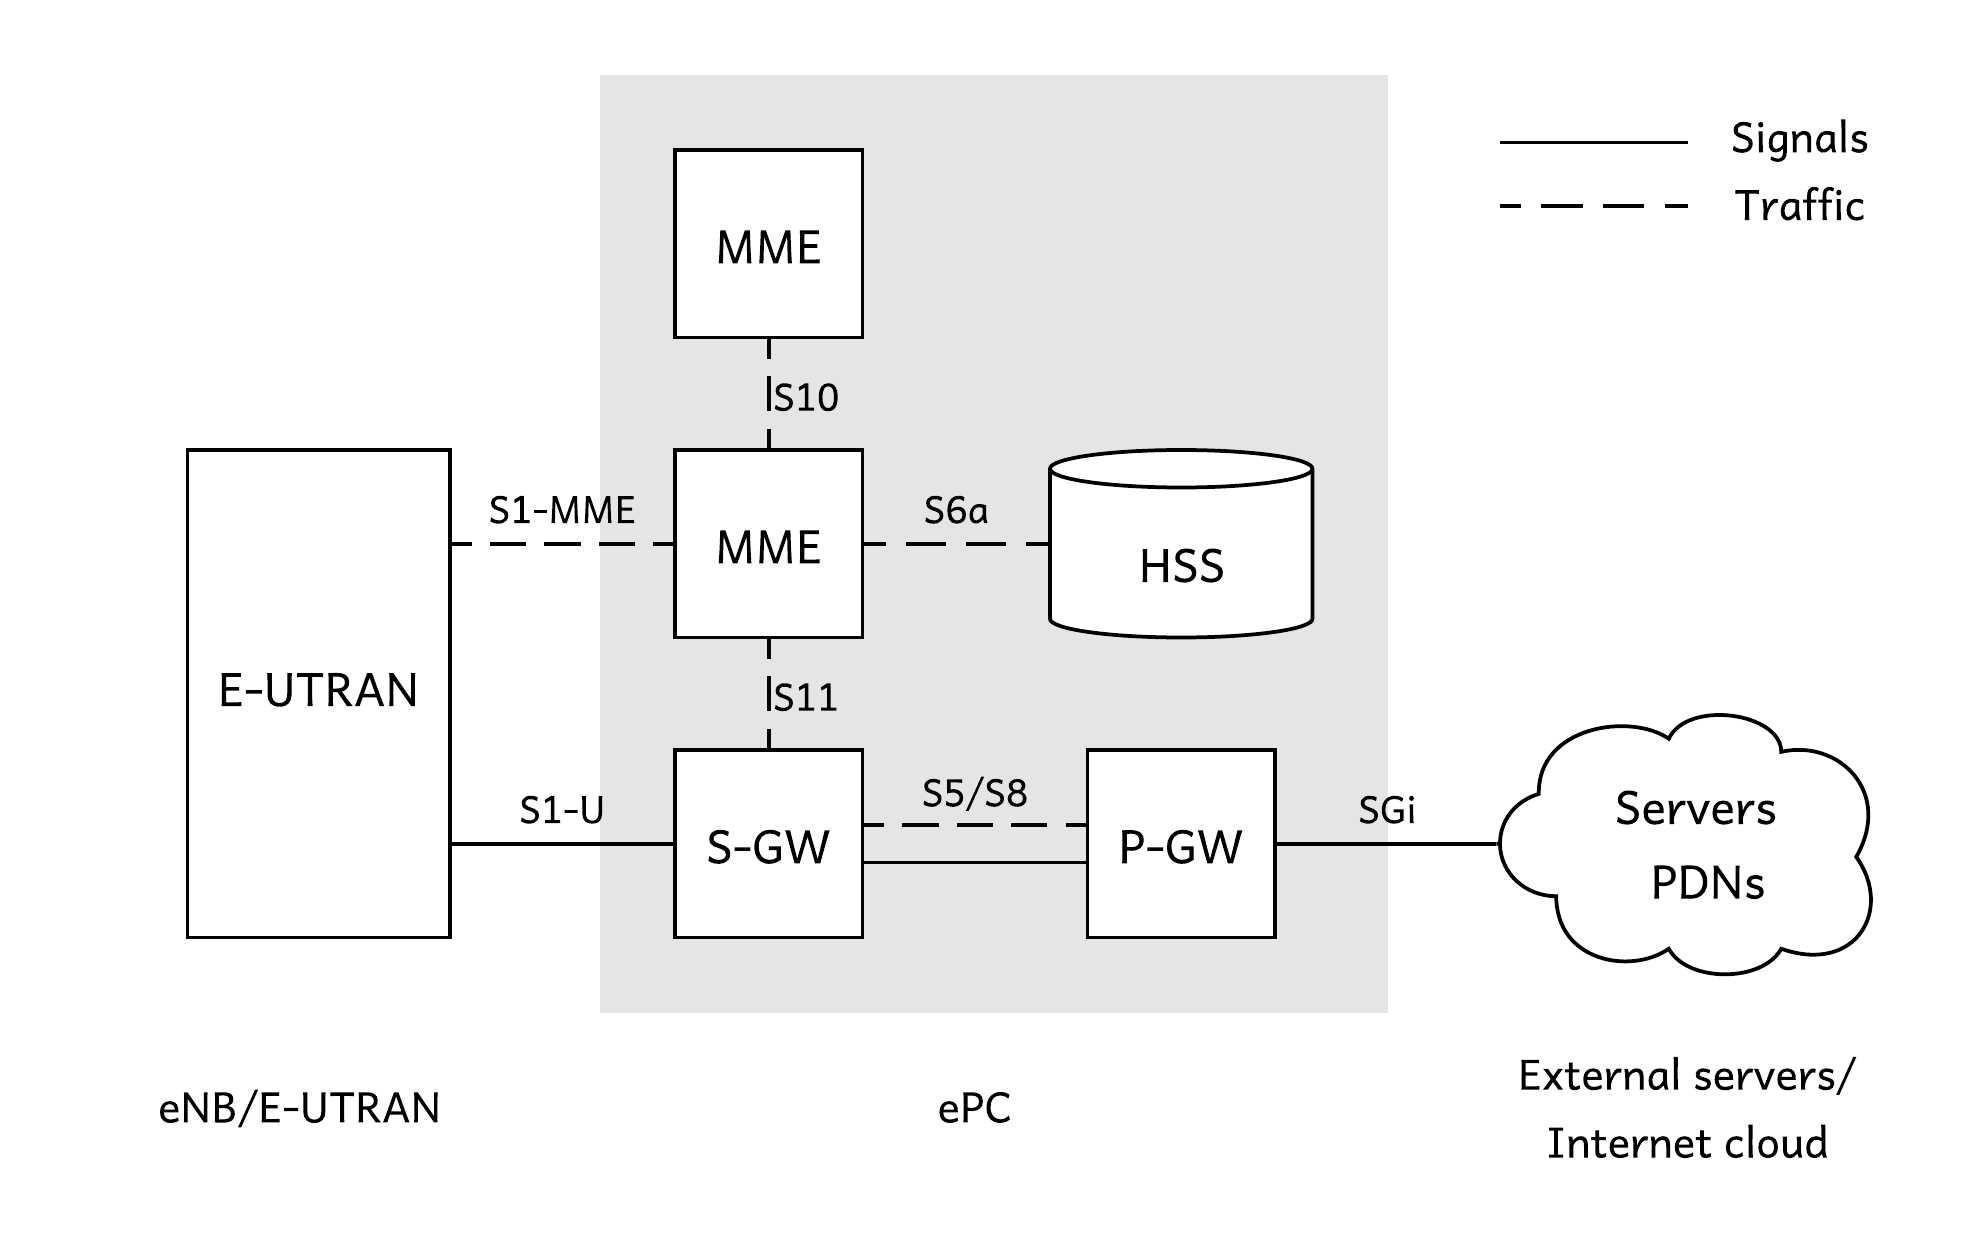
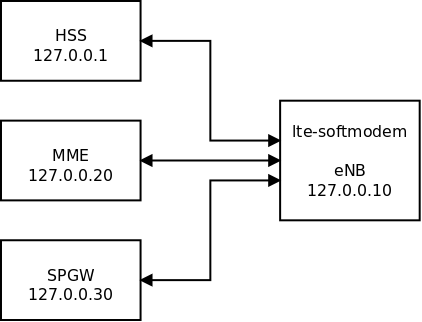
The ePC consists of HSS, MME, SGW and PGW, expanded as Home Subscriber Server, Mobility management entity, Serving gatewaty and Packet gateway. The same is depicted pictorially below with the interfaces as defined by the 3gpp standardisation commitee
Given this above initial intro, how to bring up the 4G setup in a single PC will be described here
Procedure
1. Machine setup
We used a machine with below specs
    Architecture: x86-64
Operating System: Ubuntu 18.04.4 LTS
          Kernel: Linux 4.15.0-99-generic
             CPU: 2 cores, 1 thread per core
RAM: 4GB-
Update, upgrade the machine and install git
sudo apt-get update
sudo apt-get upgrade
sudo apt-get install git
-
Add the OAI repository as authorized remote system
echo -n | openssl s_client -showcerts -connect gitlab.eurecom.fr:443 2>/dev/null | sed -ne '/-BEGIN CERTIFICATE-/,/-END CERTIFICATE-/p' | sudo tee -a /etc/ssl/certs/ca-certificates.crt
-
Install USRP drivers
sudo apt-get install libboost-all-dev libusb-1.0-0-dev python-mako doxygen python-docutils python-requests python3-pip cmake build-essential
pip3 install mako numpy
git clone git://github.com/EttusResearch/uhd.git
cd uhd; mkdir host/build; cd host/build
cmake -DCMAKE_INSTALL_PREFIX=/usr ..
make -j4
sudo make install
sudo ldconfig
sudo /usr/lib/uhd/utils/uhd_images_downloader.py
-
Download required modifications
cd ~
wget https://open-cells.com/opencells-mods-20190923.tgz
tar xf opencells-mods-20190923.tgz
2. Download and compile EPC
-
Clone OAI EPC
cd ~
wget https://open-cells.com/d5138782a8739209ec5760865b1e53b0/openair-cn.tgz
git checkout 724542d0b59797b010af8c5df15af7f669c1e838
-
Apply EPC patch
git apply ~/opencells-mods/EPC.patch
-
Install 3rd party packages for EPC
cd openair-cn; source oaienv; cd scripts
./build_hss -i
Answer yes to install freediameter
sudo mysql -u root << END
USE mysql;
UPDATE user SET plugin='mysql_native_password' WHERE User='root';
FLUSH PRIVILEGES;
END

sudo systemctl restart mysql.service

sudo mysql_secure_installation
The last command will ask a few questions:
password: set your password (linux is set in our default config files)
VALIDATE PASSWORD PLUGIN: no
Remove anonymous users: yes
Disallow root login remotely: yes
Remove test database and access to it: yes
Reload privilege tables now: yes-
Install 3PP SW for mme and spgw
./build_mme -i
Do you want to install freeDiameter 1.2.0: no Do you want to install asn1c rev 1516 patched? <y/N>: yes Do you want to install libgtpnl ? <y/N>: yes wireshark permissions: as you prefer
./build_spgw -i
Do you want to install libgtpnl ? <y/N>: no
-
Compile EPC nodes
cd openair-cn; source oaienv; cd scripts
./build_hss
./build_mme
./build_spgw
If you face compilation issues, the log files are in openair-cn/build/log In there files, look for “error:” string.
3. Download and compile eNB/UE code
-
Download OAI5G
git clone https://gitlab.eurecom.fr/oai/openairinterface5g.git
cd openairinterface5g
git checkout edb74831dabf79686eb5a92fbf8fc06e6b267d35
-
Compile eNB and UE
source oaienv
./cmake_targets/build_oai -I
./cmake_targets/build_oai -w USRP --eNB --UE
4. Network setup description
5. eNB and EPC config
-
Configure eNB config file ~/opencells-mods/enb.10MHz.b200
////////// MME parameters:
mme_ip_address = ( { ipv4 = "127.0.0.20";
ipv6 = "192:168:30::17";
active = "yes";
preference = "ipv4";
}
);
NETWORK_INTERFACES : { ENB_INTERFACE_NAME_FOR_S1_MME = "lo"; ENB_IPV4_ADDRESS_FOR_S1_MME = "127.0.0.10/8";ENB_INTERFACE_NAME_FOR_S1U = "lo"; ENB_IPV4_ADDRESS_FOR_S1U = "127.0.0.10/8"; ENB_PORT_FOR_S1U = 2152; # Spec 2152 }; -
Set MCC/MNC for SIM card in the same file
tracking_area_code = “1”; mobile_country_code = “208”; mobile_network_code = “92”; -
For EPC, we set up OAI default directory
sudo mkdir -p /usr/local/etc/oai
sudo cp -rp ~/opencells-mods/config_epc/* /usr/local/etc/oai
-
Check hss and mme certificates
cd openair-cn; source oaienv; cd scripts
./check_hss_s6a_certificate /usr/local/etc/oai/freeDiameter hss.OpenAir5G.Alliance
./check_mme_s6a_certificate /usr/local/etc/oai/freeDiameter mme.OpenAir5G.Alliance
-
Set ethernet interface which is connected to internet
Set appropriate interface in /usr/local/etc/oai/spgw.conf, in this case it is eth0
PGW_INTERFACE_NAME_FOR_SGI = "eth0";
PGW_MASQUERADE_SGI = "yes";-
Set SIM MCC/MNC
Use the same value from eNB config in /usr/local/etc/oai/mme.conf
GUMMEI_LIST = ( MCC="208" ; MNC="92"; MME_GID="4" ; MME_CODE="1"; } );
TAI_LIST = ({MCC="208" ; MNC="92"; TAC = "1"; } );-
Check DB parameters Open /usr/local/etc/oai/hss.conf and update DB values if required
Each time you import this db, it erases the entire database (example: you set mysql password to “linux”)
~/opencells-mods/hss_import 127.0.0.1 root linux oai_db ~/opencells-mods/opencells_db.sql
We use to modify the db by updating this file with regular text editor, then we re-load the entire database
if you modified the hss db directly, export script is used
~/opencells-mods/hss_export
6. UE configuration
We’re configuring UE in the same machine under diferent namespace ueNameSpace
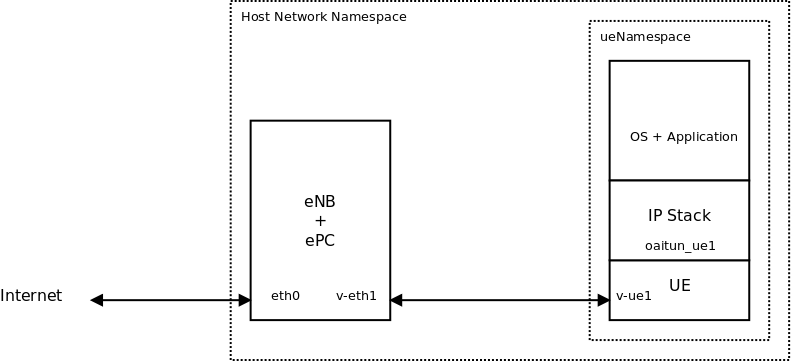
The picture above depicts what constitutes the ue-namespace. The v-eth1 and v-ue1 are the virtual interfaces, setup for the communication between UE and eNB. It is to be noted that the PHY, MAC, RLC and PDCP layers of the UE-stack are present between the v-ue1 and oaitun_ue1 interfaces.
sudo bash
ip netns delete ueNameSpace
ip link delete v-eth1
ip netns add ueNameSpace
ip link add v-eth1 type veth peer name v-ue1
ip link set v-ue1 netns ueNameSpace
ip addr add 10.200.1.1/24 dev v-eth1
ip link set v-eth1 up
iptables -t nat -A POSTROUTING -s 10.200.1.0/255.255.255.0 -o eth0 -j MASQUERADE
iptables -A FORWARD -i eth0 -o v-eth1 -j ACCEPT
iptables -A FORWARD -o eth0 -i v-eth1 -j ACCEPT
ip netns exec ueNameSpace ip link set dev lo up
ip netns exec ueNameSpace ip addr add 10.200.1.2/24 dev v-ue1
ip netns exec ueNameSpace ip link set v-ue1 up
7. Test and Verification
-
Create a new window. Start the hss
cd openair-cn; source oaienv; cd scripts; ./run_hss
-
Create a new window. Start the mme
cd openair-cn; source oaienv; cd scripts; ./run_mme
-
Create a new window. Start the spgw
cd openair-cn; source oaienv; cd scripts; sudo -E ./run_spgw
-
Create a new window. Start the eNB
sudo bash
cd ~/openairinterface5g; source oaienv
cd cmake_targets/lte_build_oai/build
./lte-softmodem --rfsim -O ~/opencells-mods/enb.10MHz.b200 --log_config.hw_log_level error
-
Create a new window. Start the UE
ip netns exec ueNameSpace bash
cd ~/openairinterface5g; source oaienv
cd cmake_targets/lte_build_oai/build
./lte-uesoftmodem -C 2685000000 -r 50 --rfsim --rfsimulator.serveraddr 10.200.1.1
-
Create a new window. Start the UE shell. And ping the internet through the UE interface.
sudo ip netns exec ueNameSpace bash
route add default oaitun_ue1
ping 10.0.2.2
wget http://198.58.112.207
Acknowledgement
We would like to acknowldege opencells.org.
This blog is an extension based on a couple of links in their website - All in one OpenAirInterface and RF simulator and OAI UE tutorial
Results
Below ping statistics of standard eth0 interface followed by oaitun_ue1 interface shows the higher latency of the later one.
--- 8.8.8.8 ping statistics ---
200 packets transmitted, 200 received, 0% packet loss, time 203940ms
rtt min/avg/max/mdev = 0.631/2.146/61.542/5.527 ms
--- 8.8.8.8 ping statistics ---
200 packets transmitted, 199 received, 0% packet loss, time 202236ms
rtt min/avg/max/mdev = 8.962/17.459/124.511/11.735 ms
Conclusion
Hope this article provided the reader, with the method to bring-up the OAI code in a single machine, using the concept of namespaces. It is an attempt to share our experiences when we brought this setup up. Zilogic is associated with IISc, as a development partner, as part of the 5G testbed program undertaken across India.
More details of the same is available at: http://www.zilogic.com/blog/news-dev-partner-iisc.html
To know more about our embedded platform engineering capabilities, please visit: http://www.zilogic.com/services.html#platform
For any queries, please write to: sales@zilogic.com