Linux based Remote Terminal Server

During development and testing of embedded systems, the serial port is used for communicating with the host. This applies to firmware based embedded systems or Linux based embedded systems. But laptops and desktops today generally do not have a serial port. At Zilogic, we hit on this problem every time we go out for a corporate training.
One solution is to use a USB-to-Serial converter. But our experience shows that the USB-to-Serial converters available in the market are hardly reliable. Fed up with the USB-to-Serial converters we decided to develop our own Remote Terminal Server, which makes the serial port available over the network.
This article describes how to build a simple 4-port Remote Terminal Server, using a Linux and various other open source tools. We hope this also serves to show how a product can be built using Linux and other Free and Open Source software components.
User Interface and Design
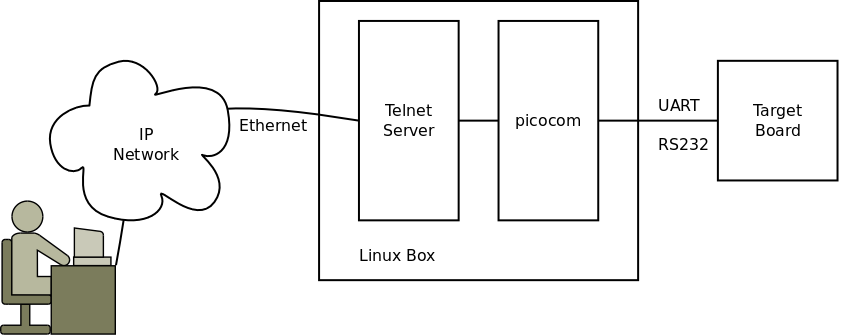
The Remote Terminal Server user interface is kept as simple as
possible - the user will access the serial port by telnetting to the
box. The serial port can be selected by specifying the appropriate
username serial1, serial2, serial3 and serial4.
When the user logins in with username serial1, instead of starting
the shell, we start a terminal program like picocom on the
corresponding serial port.
Since the Remote Terminal Server is a networked device, it needs an IP address to communicate with the external world. The IP address can be obtained using a DHCP client. We will assume that all networks, we will be using the device on, will have DHCP server.
While DHCP works, the problem with DHCP is that, the IP address is dynamically assigned and the user will not know the address. We solve this using Service Location Protocol (SLP). With SLP, the user can probe the network to determine the IP address of systems providing a service. For more information see http://openslp.org/
Building Blocks
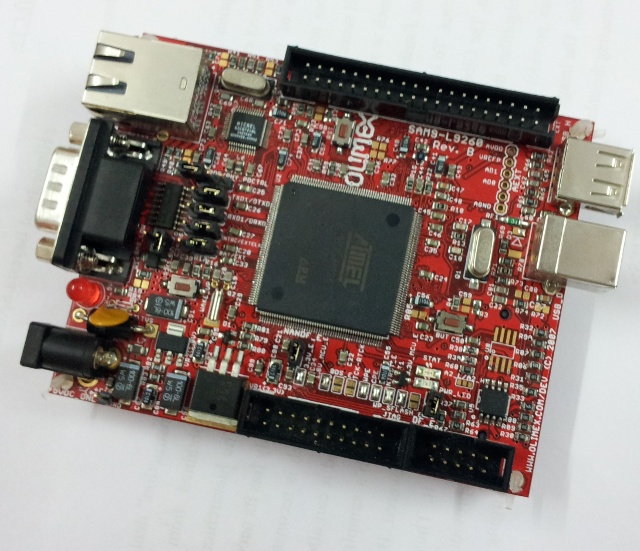
We need a board capable of running Linux, that has an ethernet interface and atleast 4 serial ports. The SAM9L-9260 Olimex Board, perfectly fits our requirements. We also require some custom hardware circuitry, since the Olimex Board only terminates one serial port.
On the software side, for the base system we will be the standard the basic U-Boot, Linux and BusyBox. Apart from these we will be using the following applications:
-
udev - to create the device nodes
-
OpenSLP - open source implementation of the SLP protocol
-
udhcpc (from BusyBox) - DHCP client
-
telnetd (from BusyBox) - Telnet server
-
picocom - Terminal emulator
Make sure you get the above programs, compile them and install them on to your target.
Integrating the Blocks
Given a system that already has Linux on it, we will see how we configure the system to make it work as Remote Terminal Server.
Kernel
By default the kernel is configured to support only 3 serial ports, one of which is used for the console. We configure 2 more serial ports available on the AT91SAM9260, by modifying the board specific code, as shown below.
--- linux-2.6.39.orig/arch/arm/mach-at91/board-sam9-l9260.c     2011-12-12 19:41:44.000000000 +0530
+++ linux-2.6.39/arch/arm/mach-at91/board-sam9-l9260.c  2011-12-12 19:54:20.000000000 +0530
@@ -63,6 +63,13 @@
        /* USART1 on ttyS2. (Rx, Tx, CTS, RTS) */
        at91_register_uart(AT91SAM9260_ID_US1, 2, ATMEL_UART_CTS | ATMEL_UART_RTS);

+       /* USART1 on ttyS3. (Rx & Tx) */
+       at91_register_uart(AT91SAM9260_ID_US2, 3, 0);
+
+       /* USART1 on ttyS4. (Rx & Tx) */
+       at91_register_uart(AT91SAM9260_ID_US3, 4, 0);
+
+
        /* set serial console to ttyS0 (ie, DBGU) */
        at91_set_serial_console(0);
 }
Shell Replacement
We create a bunch of scripts that will be invoked instead of the
shell, when the user logs in. There should be one script for each
serial port. The script for serial port /dev/ttyS1 is shown below.
#!/bin/sh

picocom /dev/ttyS1
Users
We create the users serial1, serial2, serial3, serial4 using
adduser.
# adduser -s /etc/serial1.script -G uucp -D serial1
# passwd -d serial1

# adduser -s /etc/serial2.script -G uucp -D serial2
# passwd -d serial2

# adduser -s /etc/serial3.script -G uucp -D serial3
# passwd -d serial3

# adduser -s /etc/serial4.script -G uucp -D serial4
# passwd -d serial4
The login shell is specified using the -s option. In this case, it
happens to be our script that launches picocom. The group is
specified using the -G option as uucp, since udev by default
sets the serial devices to group uucp. Passwords are not assigned by
specifying the -D option.
Since we do not want login passwords, it also required to delete the
passwords using passwd command, using the -d option.
IP Address and Service Discovery
On system boot up, we invoke udhcpc to acquire an IP address, and
configure the network interface.
In a perfect world we would immediately get an IP address. But in
reality, when the system boots up, the device might not have been
plugged into the Ethernet network. udhcpc is designed to handle this
as well. We start udhcpc as shown below.
# udhcpc -b -S eth0
The -b option tells udhcpc to run in the background if it cannot
acquire an IP address immediately. It will try again after 20 seconds,
by default.
The -S option tells udhcpc to log the messages to syslog.
When udhcpc acquires an IP address, it executes a script
/usr/share/udhcpc/default.script by default. The script is passed
the state as argument, and the acquired parameters in environment
variables. The script is supposed to configure the interface if an IP
address has been acquired. The script used in our case is shown below.
#!/bin/sh

[ -z "$1" ] && echo "Error: should be called from udhcpc" && exit 1

case "$1" in
    deconfig)
            ifconfig $interface 0.0.0.0
            ;;
    renew|bound)
            ifconfig eth0 $ip ${broadcast:+broadcast} $broadcast ${subnet:+netmask} $subnet
            logger ifconfig eth0 $ip ${broadcast:+broadcast} $broadcast ${subnet:+netmask} $subnet
            killall slpd
            slpd -l /var/log/slpd.log
            slptool register service:serial.zilogic:telnet://$ip:23
            ;;
esac
exit 0
If an IP address has been acquired we configure the interface using
ifconfig, restart slpd, and register our service using slptool.
We register our service with the service type serial.zilogic:telnet.
The service can be searched for from the PC using the slptool as
shown below.
$ slptool findsrvs service:serial.zilogic
Startup Script
The complete startup script /etc/rcS is listed below.
!/bin/sh

mount -a
mkdir /var/log

syslogd
klogd

hostname tuna

mknod /dev/ttyS0 c 4 64
mknod /dev/null  c 1 3
mknod /dev/console c 5 1

udevd --daemon
udevadm trigger

mkdir /dev/pts

mount devpts /dev/pts -t devpts

ifconfig lo 127.0.0.1
udhcpc -b -S

sleep 5
dropbear
telnetd
The Box
The additional hardware circuitry containing the transceiver for 4 serial ports is made on a prototyping board. The motherboard along with the proto board is wrapped up into a plastic enclosure.
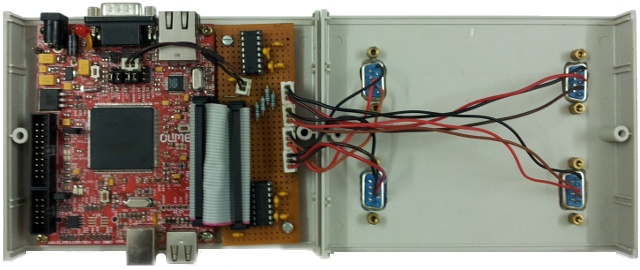
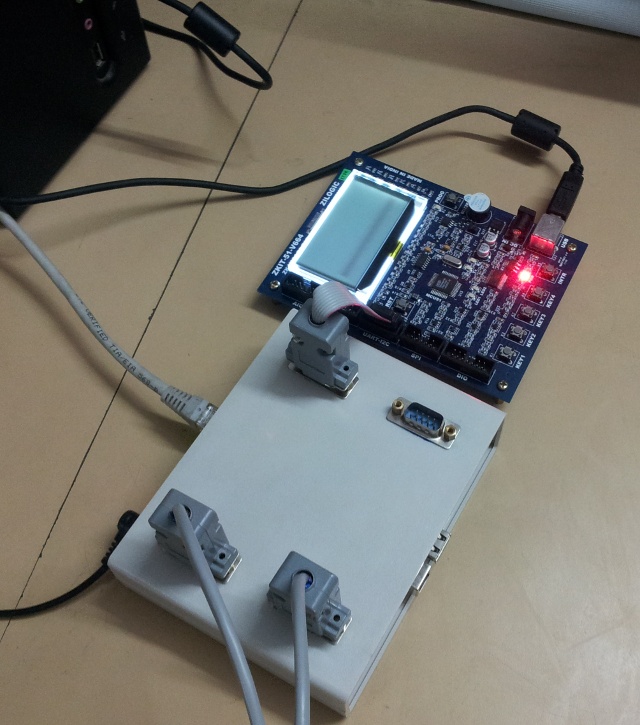
Slots are cut out on the top of the box for the serial port connectors. The finished product in action is shown below.
Concluding Remarks
Well, the Remote Terminal Server serves as a good replacement for the USB-to-Serial converters. But this is just the beginning. You could think of a lot more improvements that can be made, like a web interface for configuration, using the GPIOs for resetting the boards, etc. Hope this article has also shown how a complete product can be built from the existing Free and Open Source components.
Credits
-
Thanks to PG, Kannan and Venkat for the enclosure and hardware design.
-
Thanks to Abdul for integrating the software components and testing the product.