Getting started with Android
Android is a open source operating system designed specifically for mobile platforms. Over the last few years Android is taking over the mobile market drastically. This article shows how to get started with Android.
Setting up the Work Environment
Eclipse IDE is more suitable environment for developing Android applications.
Things to be downloaded:
-
Latest Eclipse IDE
-
ADT plugin
-
Android SDK
Complete steps for setting up working environment is given in http://developer.android.com/sdk/index.html
Steps to Create Android Virtual Device
Android Virtual Device (AVD) is an mobile phone emulator, where you can test your Android application. The steps create and start the AVD is given below.
-
Start Eclipse IDE.
-
Open your Android SDK and AVD manager.
-
Click New button to create new virtual device.
-
Provide the device name and select the appropriate API level suitable for your application.
-
Provide the appropriate SD card size.
-
Click the Create AVD button.
-
Select the virtual device you have created before and click start button.
Starting New Project
-
Start Eclipse IDE, if not already started.
-
Click
File -> New -> Android project -
Enter the project name
-
Select the API level same as your Virtual device API level
-
Enter the application name and package name. Package name should start with "com."
-
Enter the Activity name and SDK version number
-
Click the finish button.
Example:
Project Name |
hello |
API Level |
2.2(8) |
Application Name |
Hello Android |
Activity Name |
Hello |
SDK version |
8 |
Directory Structure of a New Project
-
src- This folder contains your Java class files. Class files generally extend theActivityclass. -
gen- This folder contains an automatically generated Java file calledR.java. This Java file has references for all your resourses. Eg. GUI layout XML files, image files, media files, etc. -
res- This folder contain all your resourses.-
drawable- contains image files -
layout- contains GUI layout xml files -
values- contains all your text or string used in your GUI layout
-
-
AndroidManifest.xml- This file contains list of Activity classes and permissions to access the hardware.
Hello World
The Hello World application gets the user name as input and prints a hello world message to the user. This example demonstrates the TextView, EditText and Button widgets. Create a new project using the steps explained above.
Creating GUI Layout
We can design our GUI layout either using drag and drop method or we can directly edit the XML file. Open the main.xml file under layout folder and replace the text with the below content.
<?xml version="1.0" encoding="utf-8"?>
<LinearLayout xmlns:android="http://schemas.android.com/apk/res/android"
    android:orientation="vertical"
    android:layout_width="fill_parent"
    android:layout_height="fill_parent"
    >
    <TextView
        android:text="Enter your name:"
        android:id="@+id/textView1"
        android:layout_width="wrap_content"
        android:layout_height="wrap_content">
        </TextView>
    <EditText
        android:layout_width="match_parent"
        android:id="@+id/editText1"
        android:layout_height="wrap_content"
        android:text="">
        </EditText>
    <LinearLayout
    android:layout_width="match_parent"
    android:id="@+id/linearLayout1"
    android:layout_height="wrap_content">
        <Button
                android:text="SHOW"
                android:id="@+id/button1"
                android:layout_width="wrap_content"
                android:layout_height="wrap_content">
                </Button>
        <Button
                android:text="CLEAR"
                android:id="@+id/button2"
                android:layout_width="wrap_content"
                android:layout_height="wrap_content">
                </Button>
    </LinearLayout>
    <TextView
        android:text="Welcome Message:"
        android:id="@+id/textView2"
        android:layout_width="wrap_content"
        android:layout_height="wrap_content">
        </TextView>
</LinearLayout>
In the above XML file we have used the linear layout to place widgets. In this example we used two TextView widgets, two Button widgets and one EditText. Buttons were placed inside another linear layout for proper alignment.
Open your Java file present in the src folder and replace the text
with below content.
package com.hello;
import android.app.Activity;
import android.os.Bundle;
import android.view.View;
import android.view.View.OnClickListener;
import android.widget.Button;
import android.widget.EditText;
import android.widget.TextView;
public class Hello extends Activity {
EditText name;
Button showButton;
Button clearButton;
TextView hello;
/** Called when the activity is first created. */
@Override
public void onCreate(Bundle savedInstanceState) {
super.onCreate(savedInstanceState);
setContentView(R.layout.main); /*  */
name = (EditText) findViewById(R.id.editText1); /*
*/
name = (EditText) findViewById(R.id.editText1); /*  */
hello = (TextView) findViewById(R.id.textView2);
showButton = (Button) findViewById(R.id.button1);
clearButton = (Button) findViewById(R.id.button2);
showButton.setOnClickListener(new OnClickListener() { /*
*/
hello = (TextView) findViewById(R.id.textView2);
showButton = (Button) findViewById(R.id.button1);
clearButton = (Button) findViewById(R.id.button2);
showButton.setOnClickListener(new OnClickListener() { /*  */
public void onClick(View v) {
hello.append("\n\n"+"Hello! "+name.getText().toString());
}
});
clearButton.setOnClickListener(new OnClickListener() {
public void onClick(View v) {
name.setText("");
hello.setText("");
hello.setText("Welcome Message:");
}
});
}
}
*/
public void onClick(View v) {
hello.append("\n\n"+"Hello! "+name.getText().toString());
}
});
clearButton.setOnClickListener(new OnClickListener() {
public void onClick(View v) {
name.setText("");
hello.setText("");
hello.setText("Welcome Message:");
}
});
}
}
The setContentView() method is used specify which GUI layout is
to be used. Here we select the GUI layout main.xml. The generated
R class contains a ID which refers to the GUI layout.
| |
The findViewById() method is used to get a reference to
widget. Here again we use an ID in the R class which refers to the
widget.
| |
A click event listener is registered on the showButton and the
clearButton.
|
Running Your Application
A Run Configuration binds an activity in a project and an Android Virtual Device. The procedure to create a Run Configuration is given below. Once a Run Configuration is created, successive runs can reuse the previously created configuration.
-
In the Eclipse IDE, select the menu item
Run -> Run Configuration ...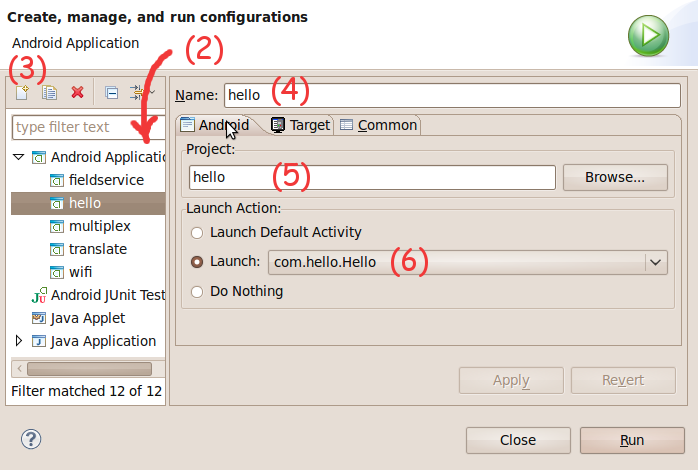 Figure 2. Creating a Run Configuration
 -
In the
Run Configuration ...dialog, selectAndroid Application. -
Click on
New. -
Enter a configuration name of your project -
hello. -
Choose your project folder
hello. -
Select the activity to be launched
com.hello.Hello.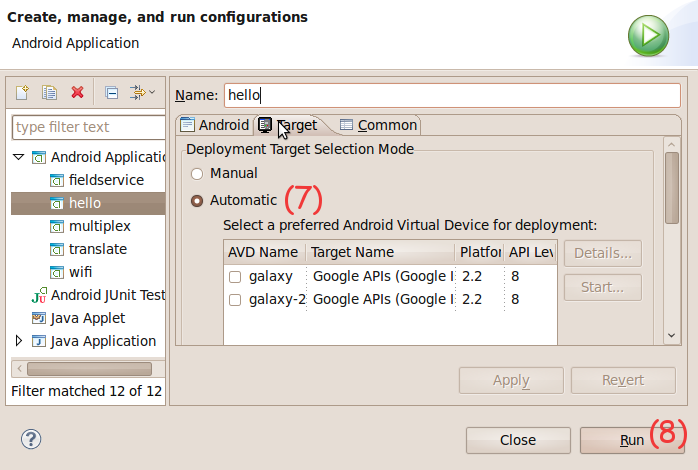 Figure 3. Creating a Run Configuration
 -
Ensure
Deployment Target Selection ModeisAutomatic. This will cause the activity to be launched in an AVD, with a matching Platform and API level. -
Click on
Run.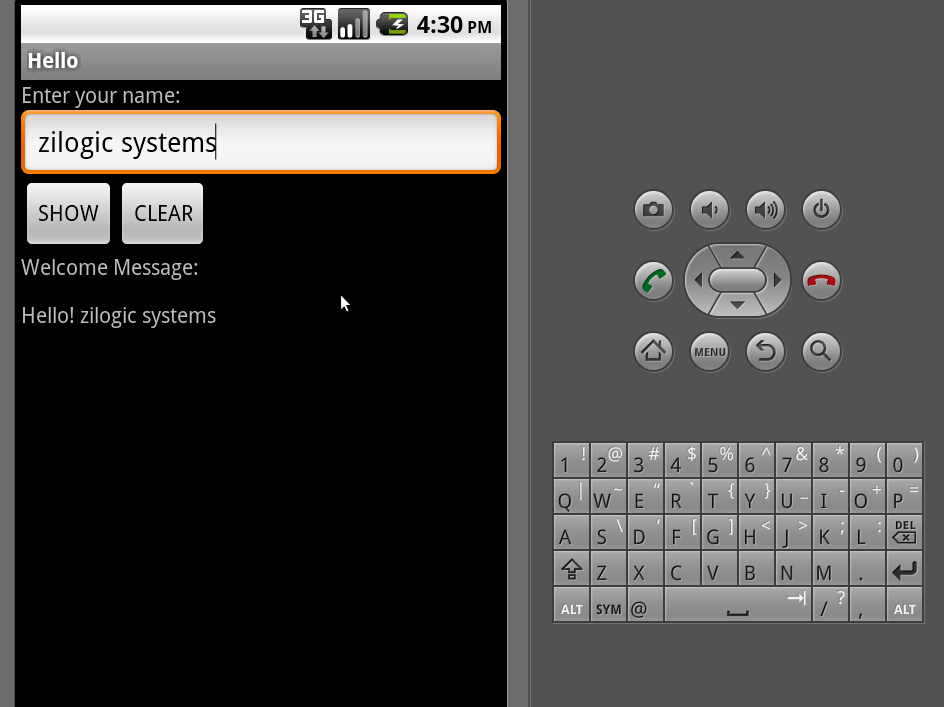 Figure 4. Hello World in Action